If you like to gain new knowledge from books and would like to get a short course to the DHTMLX library, there is a good news for you. Packt Publishing released a book called “Learning DHTMLX Suite UI” written by Eli Geske, a programmer from Miami, Florida. With his team, Eli develops complex web interfaces, […]
↧
Learning DHTMLX Suite UI Book
↧
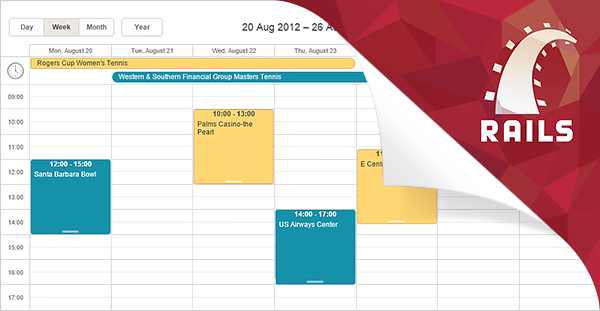
Using DHTMLX Grid with Ruby on Rails
This is the update for the previous tutorial that explains how to use dhtmlxGrid with Ruby on Rails backend. We have rewritten this tutorial to be up to date with the latest RoR version. By following this step-by-step instructions, you will get an editable grid that loads its data from Ruby on Rails and saves […]
↧
↧
DHTMLX Gantt Chart Updated to Version 2.1
We are proud to introduce the new version of our JavaScript Gantt chart library, dhtmlxGantt 2.1. An updated version fixes the known bugs, works better with large data sets, and comes with a number of new features, such as milestones, custom configuration of the lightbox, non-linear time scale, etc. Some of the new and exciting […]
↧
Interactive Gantt Chart with AngularJS and dhtmlxGantt
Last time we explained how to use dhtmlxScheduler with AngularJS, a popular JavaScript MVW framework. In this tutorial, we will guide you through adding an interactive Gantt chart to an AngularJS app using dhtmlxGantt. dhtmlxGantt is an open source (GPL) JavaScript library that draws attractive Gantt charts and provides a convenient way of project schedule […]
↧
dhtmlxVault 2.1: Minor Improvements and Bug Fixes
The minor update is available for dhtmlxVault, our JavaScript file upload library. Version 2.1 introduces a number of bug fixes and better support for IE. What’s new in dhtmlxVault 2.1: drag-and-drop functionality is fixed for IE11 strings.dnd added to customize the text that notifies the end user about the ability to drag-and-drop the files for […]
↧
↧
DHTMLX 4.0 Preview: New Skins, Improved Performance
We are now working hard on the new update of dhtmlxSuite, a collection of JavaScript UI widgets. The main part is almost completed and we are on the stage of testing, bug fixing, and updating the documentation for the new release. So what are the new and cool features that will be added in DHTMLX […]
↧
Gantt Chart for ASP.NET MVC with dhtmlxGantt
This tutorial will lead you through the steps required to integrate dhtmlxGantt into an ASP.NET MVC application. dhtmlxGantt is an open source (GPL) JavaScript library that draws attractive Gantt charts and allows the end users to edit the tasks in a convenient way. We will learn how to put this Ajax-based Gantt chart on a […]
↧
Export to PDF/PNG for dhtmlxGantt
If you need to print a Gantt chart that you created with dhtmlxGantt, we now provide an online export service that allows you to export your chart to PDF or PNG formats. To see how the export service works, try this demo. If you need technical details, read this article in the documentation. Note that […]
↧
DHTMLX 4.0 Released with New Look and Faster Performance
We are happy to introduce the release of DHTMLX 4.0, a complete JavaScript UI library. This update includes performance improvements, bug fixes and significant increasing in speed. Also the new release brings smooth rendering and improved look and feel provided by the redesigned skins. One of the important updates is the common way of data […]
↧
↧
dhtmlxScheduler Updated to Version 4.1
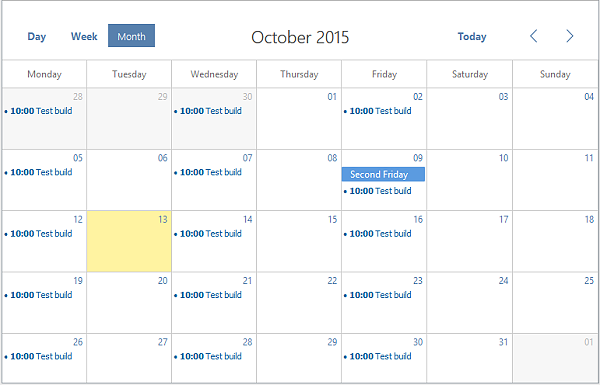
We are pleased to announce the release of dhtmlxScheduler 4.1, an embeddable JavaScript scheduling calendar for planning and managing events and tasks. Version 4.1 introduces a new flat skin, enhanced export to PNG and PDF, the ability to resize event boxes in Month View, and other useful features and improvements. Moreover, the updated dhtmlxScheduler allows […]
↧
How to Use DHTMLX Gantt Chart with FireBase Platform
In this post we’d like to share the instructions that will help you to use dhtmlxGantt with Firebase. For this we developed a special adapter that you’re welcome to download from github.
Firebase is a powerful platform that provides API for data storage and real-time synchronization, and the server where the data is stored. Moreover, it includes user authentication, static hosting, and more.
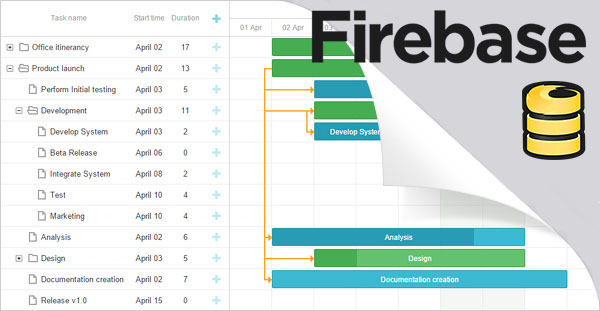
Firebase adapter for dhtmlxGantt: what for?
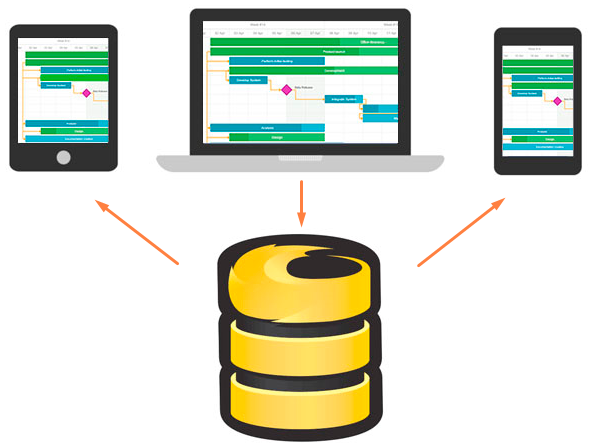
Some time ago real-time sync of web apps was a cool feature, but today it’s a must-have. The changes that are made in the app will be synced to all clients: both to the connected users in real-time and to those who are offline (data is synchronized instantly when your app regains connectivity). So, all the changes made to the Gantt Chart in your application will be transfered to clients working with your app.
How to use
Step 1. First af all, we need to include dhtmlxGantt and Firebase files on the page.
<!-- dhtmlxGantt -->
<script src="../source/dhtmlx_gantt/sources/dhtmlxgantt.js"></script>
<link rel="stylesheet" href="../source/dhtmlx_gantt/sources/skins/dhtmlxgantt_skyblue.css">
<!-- dhtmlxGantt-Firebase adapter -->
<script type="text/javascript" src="../source/dhtmlx_gantt_firebase.js"></script>
<!-- FireBase -->
<script src="https://cdn.firebase.com/js/client/2.2.4/firebase.js"></script>
Step 2. The next step is to create html for dhtmlxGantt:
<div id="gantt_here" style="width: 100%; height: 500px;"></div>
Step 3. Now we init dhtmlxGantt:
gantt.init("gantt_here");
Step 4. Create firebase connection and set this to the gantt.
Note: we used our test base. Your need to create your own base on firebase.com and use your URL.
var data = new Firebase("https://dhtmlxgantttest.firebaseio.com/"),
gantt.firebase({tasks: data.child("tasks"), links: data.child("links")});
gantt.firebase({tasks: data.child("tasks"), links: data.child("links")});
Well, that’s all we need to start using dhtmlxGantt on FireBase Platform. If you have any questions/comments, you’re welcome to leave them below.
Thanks for reading!
↧
DHTMLX Summer 2015 Highlights
We decided to start publishing season infographic with the most important news that you might have missed. This time we collected all the news, tutorials and announcements that we had in June – August, 2015. You may find full list and links to all of them below.

In short, our JavaScript UI library was updated twice – we released dhtmlxSuite 4.3 and dhtmlxSuite 4.4; we also released dhtmlxGantt 3.3 with usual long list of new features; updated PHP connector and added Laravel support; shared two useful integrations with detailed guidances – dhtmlxScheduler with MeteorJS and dhtmlxGantt with FireBase.
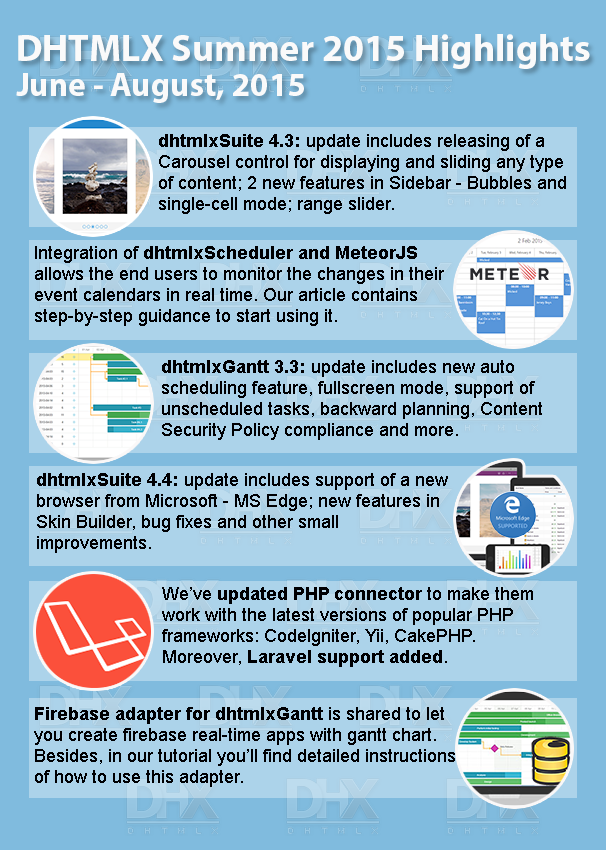
Updates:
dhtmlxSuite 4.3: Carousel, Sidebar with Bubbles, Range Slider and More
dhtmlxSuite 4.4 with Support of MS Edge and Updated Skin Builder
dhtmlxGantt 3.3: Auto scheduling, Fullscreen Mode and More
Updated PHP Connector and Laravel Support Added
Tutorials:
How to Use dhtmlxScheduler in MeteorJS Based Apps
How to Use DHTMLX Gantt Chart with FireBase Platform
Other news:
DHTMLX Suite 4.4 Beta is Available
Support of dhtmlxSuite 3.6 and Old Browsers Can Be Stopped [Poll]
Gantt, Scheduler and Suite Documentation is Available in PDF
Thanks for reading and stay tuned!
↧
FireBase Adapter for Real-Time Apps with dhtmlxScheduler
Some time ago we shared our first Firebase adapter created for dhtmlxGantt. And today we’d like to share the similar one, but for dhtmlxScheduler.
Well, if you still didn’t meet Firebase, then you should know that it provides a realtime database and backend as a service. The service provides application developers an API that allows application data to be synchronized across clients and stored on Firebase’s cloud.
dhtmlxScheduler + Firebase = … ?
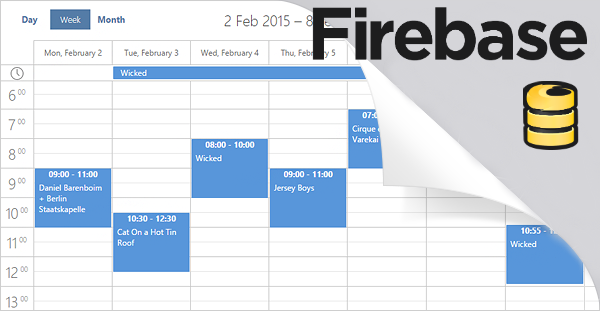
… Dynamic Event Calendar in your app. The changes that were made in your application will be sent to the server and then sync with all users of your app. Those users who are offline will get these changes when their app regains connectivity.
To start getting advantages from this integration, we offer you to use our Firebase adapter that you may download from github. The package also includes samples and instructions which we’d also like to share here.
How to use
Step 1. We begin with including dhtmlxScheduler and Firebase files on the page:
Download dhtmlxScheduler
Download Firebase adapter for Scheduler
<!-- dhtmlxScheduler -->
<script src="../source/dhtmlx_scheduler/sources/dhtmlxscheduler.js"></script>
<link rel="stylesheet" href="../source/dhtmlx_scheduler/sources/skins/dhtmlxscheduler.css">
<!-- dhtmlxScheduler-Firebase adapter -->
<script type="text/javascript" src="../source/dhtmlx_scheduler_firebase.js"></script>
<!-- FireBase -->
<script src="https://cdn.firebase.com/js/client/2.2.4/firebase.js"></script>
Step 2. In this step we create html for dhtmlxScheduler:
<div id="scheduler_here" class="dhx_cal_container" style="width: 100%; height: 500px;">
<div class="dhx_cal_navline">
<div class="dhx_cal_prev_button"> </div>
<div class="dhx_cal_next_button"> </div>
<div class="dhx_cal_today_button"></div>
<div class="dhx_cal_date"></div>
<div class="dhx_cal_tab" name="day_tab" style="right: 332px;"></div>
<div class="dhx_cal_tab" name="week_tab" style="right: 268px;"></div>
<div class="dhx_cal_tab" name="month_tab" style="right: 204px;"></div>
<div class="dhx_cal_tab" name="year_tab" style="right: 140px;"></div>
</div>
<div class="dhx_cal_header"></div>
<div class="dhx_cal_data"></div>
</div>
Step 3. Now it’s time to init dhtmlxScheduler:
scheduler.init("scheduler_here");
Step 4. And the final step is to create firebase connection and set this to scheduler:
Note: we used our test base. Your need to create your own base on firebase.com and use your URL.
var data = new Firebase("https://dhtmlxschedulertest.firebaseio.com"),
events = data.child("events");
scheduler.firebase(events);
events = data.child("events");
scheduler.firebase(events);
These simple 4 steps show you how to add Event Calendar to your Firebase application. Don’t hesitate to share your opinion in the comment section below.
Thanks for reading!
↧
↧
How to Use dhtmlxScheduler with Ruby on Rails – Part 1 [Tutorial]
In this tutorial we’d like to show you how to use our event calendar, dhtmlxScheduler, with Ruby on Rails, a web application framework written in Ruby. The tutorial consists of two parts: firstly, we’ll create a simple scheduler with data saving and loading, the second part is adding recurring events to it. Let’s start.
Creating a scheduler
Step 1. The first thing we need to do is to create a new project. For this we need to run the next command:
rails new path/to/your/application
Step 2. After that create a home controller:
rails generate controller home index
Step 3. Open config/routes.rb and replace
get 'home/index'
with
root :to => 'home#index'
When it’s done, check the server performance with the following command:
rails server
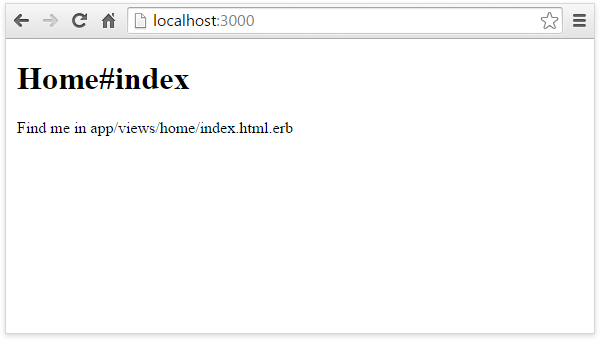
When you open http://localhost:3000/ in browser, you should get this page:
Step 4. Finished with these settings, we’ll proceed to Scheduler component. So, the next step is to download dhtmlxScheduler.
The following files unpack to vendor/assets/javascripts/:
codebase/dhtmlxscheduler.js
codebase/ext
codebase/locale
These files to vendor/assets/stylesheets/:
codebase/dhtmlxscheduler.css
codebase/dhtmlxscheduler_classic.css
codebase/dhtmlxscheduler_flat.css
codebase/dhtmlxscheduler_glossy.css
Then we need to create “assets” folder in the “public” directory and unpack the following files to it:
codebase/imgs
codebase/imgs_dhx_terrace
codebase/imgs_flat
codebase/imgs_glossy
Open config/initializers/assets.rb. We need to add the style sheet and dhtmlxscheduler.js file to the precompile array.
For this, add the next lines to this file:
Rails.application.config.assets.precompile += %w( dhtmlxscheduler.css )
Rails.application.config.assets.precompile += %w( dhtmlxscheduler.js )
Rails.application.config.assets.precompile += %w( dhtmlxscheduler.js )
Step 5. Open app/views/layouts/application.html.erb. This file is a template for all the pages that have common elements.
Here we include dhtmlxscheduler.js and dhtmlxscheduler.css
<!DOCTYPE html>
<html>
<head>
<title>Scheduler on Rails</title>
<%= stylesheet_link_tag 'application', media: 'all', 'data-turbolinks-track' => true %>
<%= stylesheet_link_tag 'dhtmlxscheduler', media: 'all', 'data-turbolinks-track' => true %>
<%= javascript_include_tag 'application', 'data-turbolinks-track' => true %>
<%= javascript_include_tag 'dhtmlxscheduler', 'data-turbolinks-track' => true %>
<%= csrf_meta_tags %>
</head>
<body>
<%= yield %>
</body>
</html>
Step 6. In this step we open app/views/home/index.html.erb, the file that is used for a view for our home controller. It will display the scheduler.
Now we add a container for scheduler, and then initialize our event calendar:
<div id="scheduler_here" class="dhx_cal_container" style='width:100%; height:800px;'>
<div class="dhx_cal_navline">
<div class="dhx_cal_prev_button"> </div>
<div class="dhx_cal_next_button"> </div>
<div class="dhx_cal_today_button"></div>
<div class="dhx_cal_date"></div>
<div class="dhx_cal_tab" name="day_tab" style="right:204px;"></div>
<div class="dhx_cal_tab" name="week_tab" style="right:140px;"></div>
<div class="dhx_cal_tab" name="month_tab" style="right:76px;"></div>
</div>
<div class="dhx_cal_header">
</div>
<div class="dhx_cal_data">
</div>
</div>
<script>
scheduler.init("scheduler_here");
</script>
If we run the server now, we should get our scheduler.
Step 7. Well, dhtmlxSheduler is initialized and we may proceed to further settings. Let’s create a model for an event. For this, run the following command:
rails generate model Event start_date:datetime end_date:datetime text:string
To create a database, run this:
rake db:migrate
Step 8. The database is created, but let’s check it and add a record. For this, run:
rails c
And add some sample record:
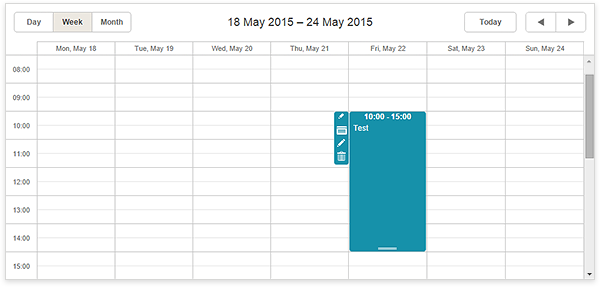
Event.create :start_date => "2015-05-22 10:00:00", :end_date => "2015-05-22 15:00:00", :text => "Test"
To display all the records, we need to run this command:
Event.all
For exit we use “exit” command.
Step 9. Now we open config/routes.rb and add the route for data loading:
match "home/data", :to => "home#data", :as => "data", :via => "get"
Step 10. Open app/controllers/home_controller.rb and add “data” action to the controller:
def data
events = Event.all
render :json => events.map {|event| {
:id => event.id,
:start_date => event.start_date.to_formatted_s(:db),
:end_date => event.end_date.to_formatted_s(:db),
:text => event.text
}}
end
events = Event.all
render :json => events.map {|event| {
:id => event.id,
:start_date => event.start_date.to_formatted_s(:db),
:end_date => event.end_date.to_formatted_s(:db),
:text => event.text
}}
end
Step 11. In this step we open app/views/home/index.html.erb for adding data loading from the server. It’s important to set scheduler.config.xml_date for correct dates parsing.
<div id="scheduler_here" class="dhx_cal_container" style='width:100%; height:800px;'>
<div class="dhx_cal_navline">
<div class="dhx_cal_prev_button"> </div>
<div class="dhx_cal_next_button"> </div>
<div class="dhx_cal_today_button"></div>
<div class="dhx_cal_date"></div>
<div class="dhx_cal_tab" name="day_tab" style="right:204px;"></div>
<div class="dhx_cal_tab" name="week_tab" style="right:140px;"></div>
<div class="dhx_cal_tab" name="month_tab" style="right:76px;"></div>
</div>
<div class="dhx_cal_header">
</div>
<div class="dhx_cal_data">
</div>
</div>
<script>
If everything is done correctly, the data loading should be successful.
Step 12. We continue with opening config/routes.rb for adding a route for data handling:
match "home/db_action", :to => "home#db_action", :as => "db_action", :via => "get"
Step 13. Open app/controllers/home_controller.rb. Add “db_action” action to the controller:
def db_action
mode = params["!nativeeditor_status"]
id = params["id"]
start_date = params["start_date"]
end_date = params["end_date"]
text = params["text"]
case mode
when "inserted"
event = Event.create :start_date => start_date, :end_date => end_date, :text => text
tid = event.id
when "deleted"
Event.find(id).destroy
tid = id
when "updated"
event = Event.find(id)
event.start_date = start_date
event.end_date = end_date
event.text = text
event.save
tid = id
end
render :json => {
:type => mode,
:sid => id,
:tid => tid,
}
end
Step 14. To save the changes in scheduler we need to use DataProcessor. Open app/views/home/index.html.erb.
Add dataProcessor:
var dp = new dataProcessor("<%= db_action_path %>");
dp.init(scheduler);
dp.setTransactionMode("GET", false);
dp.init(scheduler);
dp.setTransactionMode("GET", false);
As a result we should have:
<div id="scheduler_here" class="dhx_cal_container" style='width:100%; height:800px;'>
<div class="dhx_cal_navline">
<div class="dhx_cal_prev_button"> </div>
<div class="dhx_cal_next_button"> </div>
<div class="dhx_cal_today_button"></div>
<div class="dhx_cal_date"></div>
<div class="dhx_cal_tab" name="day_tab" style="right:204px;"></div>
<div class="dhx_cal_tab" name="week_tab" style="right:140px;"></div>
<div class="dhx_cal_tab" name="month_tab" style="right:76px;"></div>
</div>
<div class="dhx_cal_header">
</div>
<div class="dhx_cal_data">
</div>
</div>
<script>
scheduler.config.xml_date="%Y-%m-%d %H:%i";
scheduler.init("scheduler_here");
scheduler.load("<%= data_path %>", "json");
var dp = new dataProcessor("<%= db_action_path %>");
dp.init(scheduler);
dp.setTransactionMode("GET", false);
</script>
But if you’d like to use POST requests for changing the data in the database, you need to specify Transaction Mode dataProcessor = POST. Moreover, you need to change the corresponding route to:
match "home/db_action", :to => "home#db_action", :as => "db_action", :via => "post"
And you need to open app/controllers/application_controller.rb and set
protect_from_forgery with: :null_session
instead of
protect_from_forgery with: :exception
Step 15. Finally we’re ready to check our results. So, run the server:
rails server
Well, this is everything you need to start using dhtmlxScheduler with Ruby on Rails. The second part of our tutorial that will show you how to set recurring events in dhtmlxScheduler with RoR will be released in a week. Stay tuned!
↧
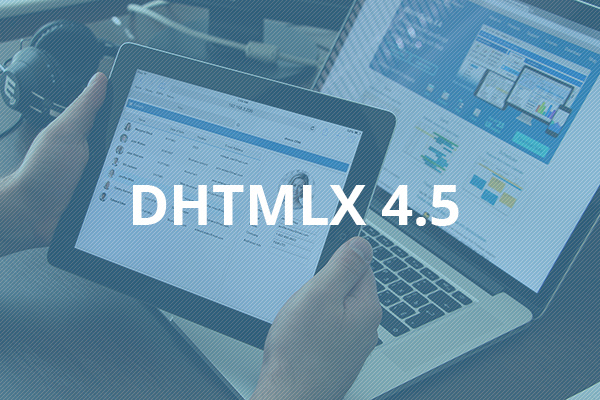
dhtmlxSuite 4.5: List Control, Sidebar Drawer and Responsive Web App
In case you’re looking for a JavaScript library for creating responsive web applications with less efforts, we have great news for you! dhtmlxSuite 4.5 update brings you a sidebar navigation drawer – a very convenient three-line menu feature that is widely used in the majority of mobile/tablet apps. Moreover, you now have the opportunity to learn and test our new demo application, that will serve you as a good example for getting know how to develop responsive web applications with DHTMLX.
Apart from it, we have a new component, several new features and many bug fixes and small improvements. So, here is a summary for you.
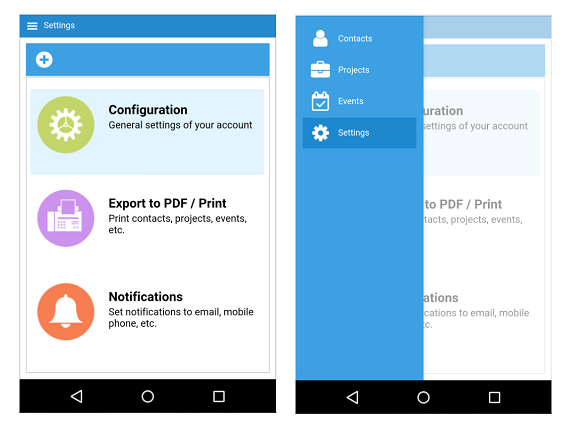
New responsive demo – apps for desktop, tablet and mobile

We invite you to check DHTMLX CRM demo application. You may open it on different devices and see how it works (use QR code below for mobiles and tablets). This example shows that by using the basic functionality of dhtmlx components, you can create fully responsive web applications.

Open the demo on tablet and mobile
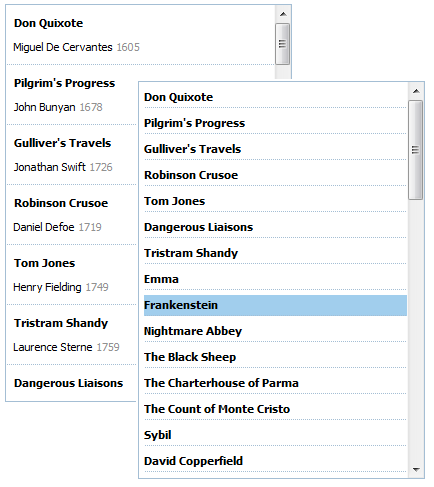
dhtmlxList control
New component is here! Meet dhtmlxList, a JavaScript UI control for displaying items in a list view. List comes with a range of the most useful features – filtering, sorting, drag-and-drop, paging, and more.
Check the live demo on its page and other samples.
Sidebar Drawer
dhtmlxSidebar got a new feature: it can hide and expand by clicking on a three-line menu button. Sidebar Drawer can save the space on your mobile/tablet app, you can add animation to it to customize the way of sliding and appearing of the menu items in the Sidebar. Check demo
Images in dhtmlxForm
Since 4.5, you may insert images in the form – a new item type is added for this purpose. Check demo

Full what’s new list can be found here. You’re welcome to download the Standard Edition of the library here.
PRO users will receive the link via email.
Feel free to leave your comments below! You may ask us “Where is dhtmlxPortal?” Well, sorry for this delay. It’s on its way, and will be released asap.
Stay tuned!
↧
Announcing Upcoming dhtmlxGantt 4.0 – Big Major Update
After recently updated dhtmlxSuite, it’s a high time to release a new version of dhtmlxGantt. The upcoming version is going to be an important update, otherwise it won’t be 4.0. dhtmlxGantt 4.0 will be released in 2 weeks, but we invite you to discover what to expect right now.
Updated 12-Nov-2015: Sorry for the delay, we found several difficulties at the stage of testing. Team is working hard on new version. Thank you for your patience.

Gantt chart becomes faster
Our aim is to eliminate performance issues when rendering big amount of tasks, so you’ll be able to work with more than 500-1000 tasks without any problems.
New functionality
Surely, apart from the big improvements that are made with the performance, you’ll receive several new features: undo-redo functionality, public interfaces for grid and timeline, the ability to use custom Grid component instead of default one, and more.
Here you may find other plans and vote for the most useful features in order we could see what’s important for you.
If you haven’t met dhtmlxGantt yet, you’re welcome to try this Gantt Chart library and start waiting for a new version with us.
Now you’re aware of upcoming update, so be ready for upgrading your versions. Follow our news on twitter, facebook and google+ to be the first to know about the release.
↧
Recurring Events in dhtmlxScheduler with Ruby on Rails – Part II
Recently we’ve shared the detailed tutorial that explains how to use our event calendar with Ruby on Rails. As promised, today we share the second part of this guide – you’ll be able to add recurring events to your calendar.
Before we start, please follow the instructions described here to prepare your scheduler for the further steps. When finished, you may proceed with adding recurring events:
Step 1. For recurring events we need three additional fields:
- rec_type (stores recurring logic);
- event_pid (parent ID of a series of events);
- event_length (a real length of a series of events).
Also we need to remove the old model. For this we run the following:
rails destroy model Event
Step 2. Use the following command to create a new model:
rails generate model Event start_date:datetime end_date:datetime text:string rec_type:string event_length:integer event_pid:integer
Step 3. Remove the events table from the database or remove db/development.sqlite3.
After that we need to run a migration:
rake db:migrate
Step 4. Open app/controllers/home_controller.rb
Here we change “db_action” action and “data” for saving and loading of recurring events:
class HomeController < ApplicationController
def index
end
def data
events = Event.all
render :json => events.map {|event| {
:id => event.id,
:start_date => event.start_date.to_formatted_s(:db),
:end_date => event.end_date.to_formatted_s(:db),
:text => event.text,
:rec_type => event.rec_type,
:event_length => event.event_length,
:event_pid => event.event_pid
}}
end
def db_action
mode = params['!nativeeditor_status']
id = params['id']
start_date = params['start_date']
end_date = params['end_date']
text = params['text']
rec_type = params['rec_type']
event_length = params['event_length']
event_pid = params['event_pid']
tid = id
case mode
when 'inserted'
event = Event.create :start_date => start_date, :end_date => end_date, :text => text,
:rec_type => rec_type, :event_length => event_length, :event_pid => event_pid
tid = event.id
if rec_type == 'none'
mode = 'deleted'
end
when 'deleted'
if rec_type != ''
Event.where(event_pid: id).destroy_all
end
if event_pid != 0 and event_pid != ''
event = Event.find(id)
event.rec_type = 'none'
event.save
else
Event.find(id).destroy
end
when 'updated'
if rec_type != ''
Event.where(event_pid: id).destroy_all
end
event = Event.find(id)
event.start_date = start_date
event.end_date = end_date
event.text = text
event.rec_type = rec_type
event.event_length = event_length
event.event_pid = event_pid
event.save
end
render :json => {
:type => mode,
:sid => id,
:tid => tid,
}
end
end
Step 5. Open config/initializers/assets.rb and add dhtmlxscheduler_recurring extension to the precompile array.
For this we need to add this line:
Rails.application.config.assets.precompile += %w( ext/dhtmlxscheduler_recurring.js )
Step 6. Open views/layouts/application.html.erb and include dhtmlxscheduler_recurring.js extension.
<!DOCTYPE html>
<html>
<head>
<title>Scheduler on Rails</title>
<%= csrf_meta_tags %>
<%= stylesheet_link_tag 'application', media: 'all', 'data-turbolinks-track' => true %>
<%= stylesheet_link_tag 'dhtmlxscheduler', media: 'all', 'data-turbolinks-track' => true %>
<%= javascript_include_tag 'application', 'data-turbolinks-track' => true %>
<%= javascript_include_tag 'dhtmlxscheduler', 'data-turbolinks-track' => true %>
<%= javascript_include_tag 'ext/dhtmlxscheduler_recurring', 'data-turbolinks-track' => true %>
</head>
<body>
<%= yield %>
</body>
</html>
Final Step 7. Well, we need to run the server once again to check our scheduler with recurring events:
rails server
If you follow the given instructions, you should now have a ready-to-use scheduler with recurring events that perfectly works with Rails framework. As you can see, there isn’t much code and integration with this framework is performed quite easy. Apart from the described features, dhtmlxScheduler has very extended functionality, and it won’t be difficult to create a full-featured event calendar that will work with Ruby on Rails.
You’re welcome to leave your comments and ask questions.
↧
↧
DHTMLX Suite Roadmap: Plans, Wishes, Your Participation
We decided to start a very good practice – we share our plans of dhtmlxSuite development in order you could be aware of what to expect. Moreover, we’d like you to take a part in this planning. In this post you’ll get know the near future of our library and learn how to influence on it.

Moving forward
Our principle #1 – never underestimate the rate of technologies development. We are always trying to move with the time: our controls support modern browsers and new devices; they correspond to the nowadays web development techniques and design. So the priority #1 is to guarantee the steady work of Suite UI controls.
Suite 5.0
The next version of dhtmlxSuite is going to be a major update. We’re planning to roll out 5.0 with a set of important and helpful updates. Here are some of them:
– DHTMLX Framework
dhtmlxSuite library has already proven itself as powerful library for building web applications. And now we set another goal – we want to tell you how to achieve the highest results by yourself, how to create really professional and fast applications with DHTMLX, how to work with DHTMLX in general. For this purpose we’ll share a set of “How-To’s” that will contain best practices and correct work with our controls.

– Visual Designer
We know that it’s time to update our Visual Designer to provide you the ability of interface prototyping in more fast and convenient way. New designer will be fully updated, get form builder tool and drag-and-drop functionality. It concerns both online and desktop versions.
– New Tree Control
In addition to the existing dhtmlxTree component we are preparing to release a new one. New Tree will be much faster, and will include the basic set of features at the beginning.
Feature requests
We’d also like to present you a public roadmap where you may check all our plans for future versions. Here is a Trello board with Suite roadmap. You may see that we’ve highlighted the updates that are planned to be a part of dhtmlxSuite 5.0. “Plans” label means that we’re going to release this feature anyway though we have no concrete dates. “Wishes” label means your feature requests that we grab from our forum, emails, support or other sources.

How to influence on it?
Vote for the features, demos, tutorials that you’d like to see in our library. If we see that some of the plans/wishes collect many votes, we’ll try to implement it in near release. The most demanded features surely will appear in dhtmlxSuite.
You have probably noticed that some of the plans are not connected with Suite update, so they can be released at any time. Moreover, the board contains dhtmlxVault roadmap as it often used together with dhtmlxSuite.
Thanks
Thank you all for your suggestions and for your requests to make this roadmap as well. With your active participation and feedbacks, dhtmlxSuite library develops and will improve. We hope that the transparency of our plans will make our relationships stronger!
↧
How To Improve DHTMLX Libraries? 3 Simple Ways
As a follow-up to our news about DHTMLX Suite roadmap, we’d like to tell you how your suggestions can appear in new versions or on our public roadmap. It concerns not only dhtmlxSuite, but dhtmlxGantt, dhtmlxScheduler, dhtmlxVault and other components. So, do you have something to suggest?
If yes, here are the ways to do this:
- Feature requests form. Just fill out 2-3 fields with detailed description of required functionality. No need to register or leave your name.
- Leave your comments on forum. We created a special topic for this purpose. You may leave you suggestions about dhtmlxSuite here or create a separate topic here to request the functionality of any DHTMLX product.
- You can always contact us via email. The most convenient way for attaching screenshots or other auxiliary information.
Thank you for your help in improving DHTMLX products! Even our recent voting showed Today button in Calendar should appear as soon as possible :) Stay tuned!
↧
Exploring Different Views of dhtmlxScheduler
Our dhtmlxScheduler provides you with the different types of data visualization. Besides the popular options, such as different time scales like day or week, our scheduler gives you some additional possibilities. For example, you can combine your schedule with the map that can be pretty helpful in case you want to plan your business trip or vacations.
If you’re working with ASP.NET, you may look at DHTMLX Scheduler.NET, a Scheduler control that works both in ASP.NET MVC and Web Forms. It has the similar range of views that are described below.
Usually, there are only three required steps that allow you to use the view you want:
1. Include the required files to your project
2. Add the proper tab to your page, so you can switch to the view you want
3. Configure the view
To understand how the views work, let’s start with the default ones.
Default Views: Day, Week, and Month
This Getting Started Guide can help you build the basic scheduler.
As we mentioned before, you should add the proper files firstly:
<link rel="stylesheet" href="./codebase/dhtmlxscheduler.css">
<script src="./codebase/dhtmlxscheduler.js"></script>
<script src="./codebase/dhtmlxscheduler.js"></script>
And here’s a bunch of DIV containers you should use to make your application work:
<div id="scheduler_here" class="dhx_cal_container" style='width:100%; height:100%;'>
<div class="dhx_cal_navline">
<div class="dhx_cal_prev_button"> </div>
<div class="dhx_cal_next_button"> </div>
<div class="dhx_cal_today_button"></div>
<div class="dhx_cal_date"></div>
<div class="dhx_cal_tab" name="day_tab" style="right:204px;"></div>
<div class="dhx_cal_tab" name="week_tab" style="right:140px;"></div>
<div class="dhx_cal_tab" name="month_tab" style="right:76px;"></div>
</div>
<div class="dhx_cal_header"></div>
<div class="dhx_cal_data"></div>
</div>
This code creates Next and Previous navigation buttons, shows you the current period, etc.
Particularly, we’re interested in these three DIV’s:
<div class="dhx_cal_tab" name="day_tab" style="right:204px;"></div>
<div class="dhx_cal_tab" name="week_tab" style="right:140px;"></div>
<div class="dhx_cal_tab" name="month_tab" style="right:76px;"></div>
<div class="dhx_cal_tab" name="week_tab" style="right:140px;"></div>
<div class="dhx_cal_tab" name="month_tab" style="right:76px;"></div>
We’ve created three tabs that can be used to switch between the Day, Week, and Month views.
During the initialization you can set the default options: an HTML container your calendar will be initialized in, the initial date of the scheduler, and the name of the initial view:
scheduler.init('scheduler_here', new Date(), 'month');
Here’s how the typical basic scheduler looks like:
As you can see, there are some previously created events rendered.
You can use tabs to switch between the available views. Here’s the Week view:
And here’s how the Day View looks like:
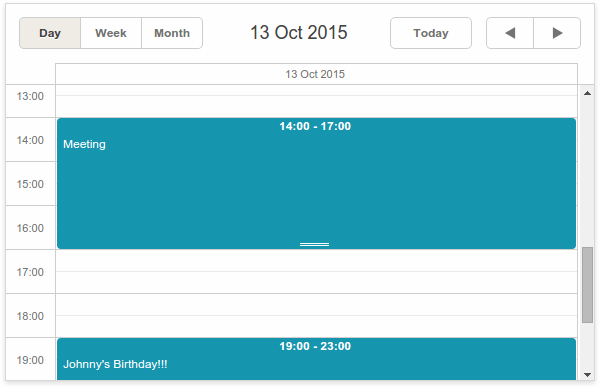
You can double-click an empty cell to create a new event or drag the existing event through the calendar grid to change the date.
Learn more: Day View, Week View, Month View.
Extending the Period. The Year View
If one month is not long enough to plan your schedule, there’s always a possibility to use the Year View.
First of all, you should include the required JavaScript file:
<script src="./codebase/ext/dhtmlxscheduler_year_view.js" ></script>
Then, add the proper tab to your page:
<div class="dhx_cal_tab" name="year_tab" style="right:280px;"></div>
And finally, set the label for the tab:
scheduler.locale.labels.year_tab ="Year";
That’s it. Now you can use the Year View:
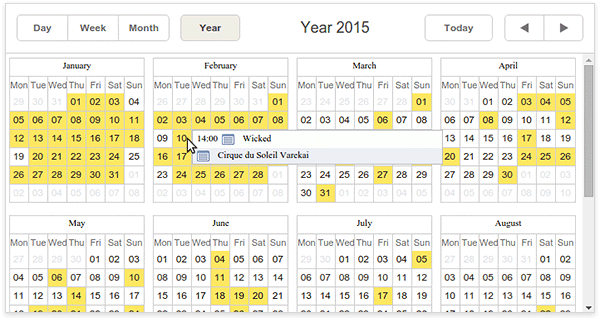
The tooltip you can see at the screenshot above allows you to edit the event. Just click the “Details” icon and the edit window will appear on the screen.
Learn more: Year View Documentation Page.
All at Once. Agenda, Week Agenda, and Grid
Now, let’s talk about the views that allow you to see all available events in the form of different types of lists.
The Agenda view displays a list of all upcoming events. To enable this view you should add the proper JavaScript to your project:
<script src="./codebase/ext/dhtmlxscheduler_agenda_view.js" ></script>
The next step is to add the tab to your page:
<div class="dhx_cal_tab" name="agenda_tab" style="right:280px;"></div>
As a result, you’ll get a list that contains all your tasks:
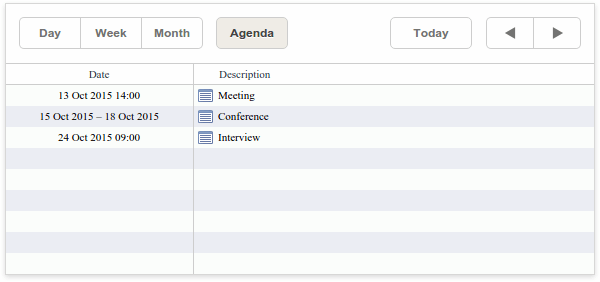
You can double-click on an empty self of this list to create a new event or click the “Details” button to edit the existing ones.
Learn more: Agenda View Documentation Page
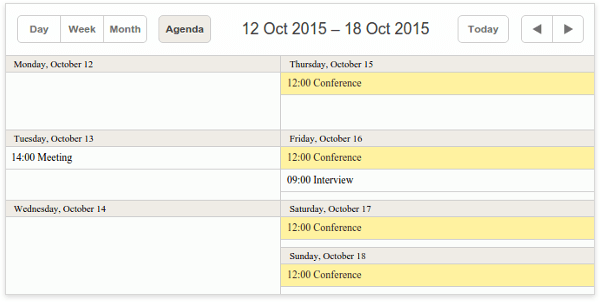
The Week Agenda view is a combination of two views: Week and Agenda. This view shows you a list of upcoming events within a week.
Here’s the required JavaScript file:
<script src="./codebase/ext/dhtmlxscheduler_week_agenda.js" ></script>
And here’s the code that adds the proper tab:
<div class="dhx_cal_tab" name="week_agenda_tab" style="right:280px;"></div>
The result is shown below:

As you can see, this view shows you the whole week at once. You can double-click the empty cell to create a new event. Double-clicking the existing event will open the edit window. Another handy feature is events highlighting. You can click the event to select it. After you select the long term event, all related records will be highlighted.
Here’s how it looks like:
Learn more: Week Agenda View Documentation Page
The Grid View looks similar to the Agenda view. But in this case, you can choose the data you want to display.
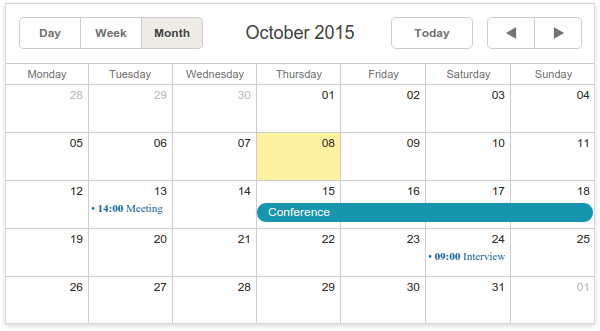
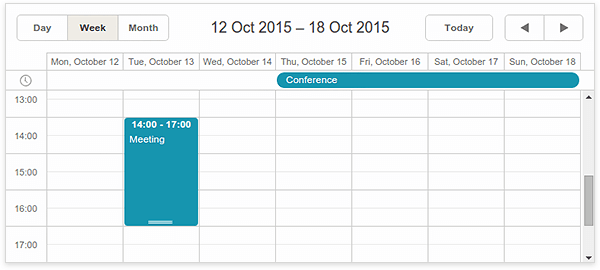
Imagine that you wish to add some comments to your calendar. Here’s how the possible array of events will look like:
var events = [
{id:1, text:"Meeting", start_date:"2015-10-13 14:00",
end_date:"2015-10-13 17:00", comment:"Project release issues"},
{id:3, text:"Interview", start_date:"2015-10-24 09:00",
end_date:"2015-10-24 10:00", comment:"Remember to smile!"},
{/* some more events */}
];
{id:1, text:"Meeting", start_date:"2015-10-13 14:00",
end_date:"2015-10-13 17:00", comment:"Project release issues"},
{id:3, text:"Interview", start_date:"2015-10-24 09:00",
end_date:"2015-10-24 10:00", comment:"Remember to smile!"},
{/* some more events */}
];
Let’s add the Grid view to our application. First of all, the required file:
<script src="./codebase/ext/dhtmlxscheduler_grid_view.js"></script>
Now you should add the Grid tab:
<div class="dhx_cal_tab" name="grid_tab" style="right:300px;"></div>
Configure the date format and change the tab label if you want to:
scheduler.config.xml_date = "%Y-%m-%d %H:%i";
scheduler.locale.labels.grid_tab = "My Grid";
scheduler.locale.labels.grid_tab = "My Grid";
Now, the most important part. We must configure the grid. You should call the createGridView method to do so:
scheduler.createGridView({
name:"grid",
fields:[ /* defines columns of the grid */
{id:"id", label:"ID", sort:"int"},
{id:"date", label:"Date", sort:"date"},
{id:"text", label:"Event", sort:"str"},
{id:"comment", label:"Comment", sort:"str"}
],
});
name:"grid",
fields:[ /* defines columns of the grid */
{id:"id", label:"ID", sort:"int"},
{id:"date", label:"Date", sort:"date"},
{id:"text", label:"Event", sort:"str"},
{id:"comment", label:"Comment", sort:"str"}
],
});
Here’s an explanation of what we’ve done. This code will create new grid with name grid that will contain a bunch of columns that the fields property contains. In this case, we have used the id property to choose what data we you want to display. It can be the ID of the event, its beginning date, or even a comment that you’ve added. The second property in our example is label. It defines the label for the column. The last property, sort, specifies the type of content that will be displayed in this column. It specifies the way of sorting. Possible values are ind, date, and str.
The result is shown below:
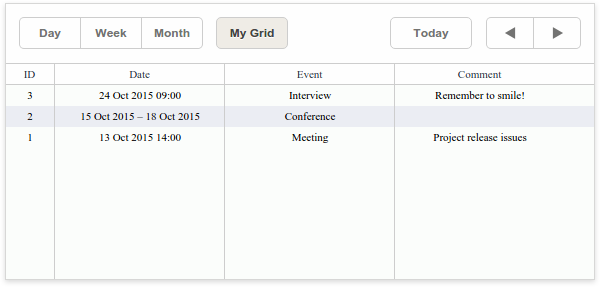
Besides this minimal amount of properties, many others can help you configure your application the way you want. You can set the with of a column, choose the date range, use custom sorting functions, etc.
Learn more: Grid View Documentation Page
Timeline View and Units View
These views allow you to visualize events horizontally with separate timelines arranged from left to right (Timeline View) or vertically
Let’s start from the Timeline View.
Add the proper JavaScript file:
<script src="./codebase/ext/dhtmlxscheduler_timeline.js"></script>
Then add the tab to your page:
<div class="dhx_cal_tab" name="timeline_tab" style="right:280px;"></div>
and set its label:
scheduler.locale.labels.timeline_tab ="Timeline";
Now you can call the createTimelineView method to configure the view
scheduler.createTimelineView({
name:"timeline",
x_unit:"minute",//measuring unit of the X-Axis.
x_date:"%H:%i", //date format of the X-Axis
x_step:30, //X-Axis step in 'x_unit's
x_size:24, //X-Axis length specified as the total number of 'x_step's
x_start:16, //X-Axis offset in 'x_unit's
x_length:48, //number of 'x_step's that will be scrolled at a time
y_unit: //sections of the view (titles of Y-Axis)
[{key:1, label:"Section A"},
{key:2, label:"Section B"},
{key:3, label:"Section C"},
{key:4, label:"Section D"}],
y_property:"section_id", //mapped data property
render:"bar" //view mode
});
It’s big enough but have no fear. Check the comments. To help you better understand what’s going on here’s little explanation. Besides the X-Axis configuration, you should also define the x-unit property that defines how many areas your calendar will consist of. In this example above we’ve created four areas with labels Section A, Section B, etc. The render property defines the view mode. There are Bar, Cell, Tree, and Days options available. The y_property property will help you attach an event to a proper timeline area. For example, if you want to add an event to Section A you should add the following property: y_property: “1″.
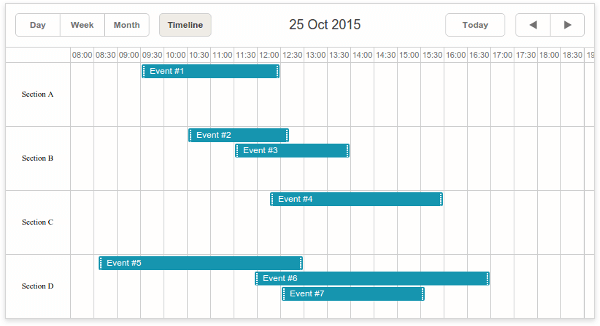
Learn more: Timeline View Documentation Page
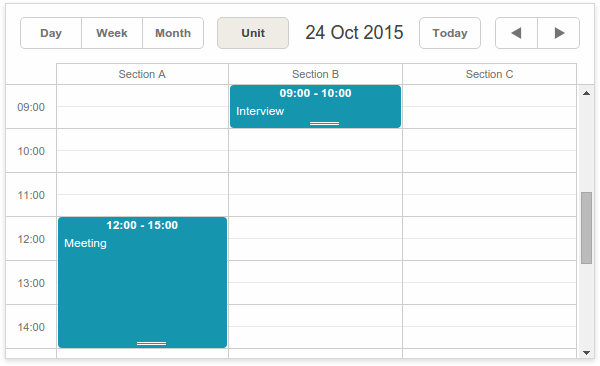
The Units View looks pretty much the same. The main difference, in this case, is that you can configure the X-Axis.
By tradition, add the JavaScript file:
<script src="./codebase/ext/dhtmlxscheduler_units.js"></script>
and add the tab to your page:
<div class="dhx_cal_tab" name="unit_tab" style="right:280px;"></div>
You can use this code to set the label fir the tab:
scheduler.locale.labels.unit_tab = "Unit"
To configure how the X-Axis will look like, you should use the createUnitsView method:
scheduler.createUnitsView({
name:"unit",
property:"unit_id", //the mapped data property
list:[ //defines the units of the view
{key:1, label:"Section A"},
{key:2, label:"Section B"},
{key:3, label:"Section C"}
]
});
name:"unit",
property:"unit_id", //the mapped data property
list:[ //defines the units of the view
{key:1, label:"Section A"},
{key:2, label:"Section B"},
{key:3, label:"Section C"}
]
});
This code will create a new view with name units. property defines the property name that can be used to define which unit will contain the proper event. The list array contains the key property that you should use to attach the event to the unit, and the label property that defines unit’s label.
That’s all you need to do for the basic configuration. The final step is to change the way you define your event. All you need to do is to add new property that will define which unit this event belongs. For example:
var events = [
{id:1, text:"Meeting", start_date:"2015-10-13 14:00",
end_date:"2015-10-13 17:00", unit_id: "1"},
{id:2, text:"Interview", start_date:"2015-10-24 09:00",
end_date:"2015-10-24 10:00", unit_id:"2"},
{ /* more events */ }
];
{id:1, text:"Meeting", start_date:"2015-10-13 14:00",
end_date:"2015-10-13 17:00", unit_id: "1"},
{id:2, text:"Interview", start_date:"2015-10-24 09:00",
end_date:"2015-10-24 10:00", unit_id:"2"},
{ /* more events */ }
];
In this case, unit_id: “1″ means that the first event will be placed within the unit with the key: 1 property.
Here’s how this view looks like:
Besides this very basic functionality, Units View allows you to assign events to several units, or, for example, display units for multiple days. Better check the documentation page to learn how you can configure it.
Learn more: Units View Documentation Page
Map View
If you travel a lot, this view will be pretty helpful, since it provides you with possibility to combine the event description wit the marker on the map. This view uses Google Maps, so this time besides the Map View JavaScript file, we should include the required Google Maps file:
<script src="http://maps.google.com/maps/api/js?sensor=false"></script>
<script src="./codebase/ext/dhtmlxscheduler_map_view.js"></script>
<script src="./codebase/ext/dhtmlxscheduler_map_view.js"></script>
Don’t forget to add the Map view tab to your page:
<div class="dhx_cal_tab" name="map_tab" style="right:280px;"></div>
And remember that it’s alway possible to rename it:
scheduler.locale.labels.map_tab = "My Map";
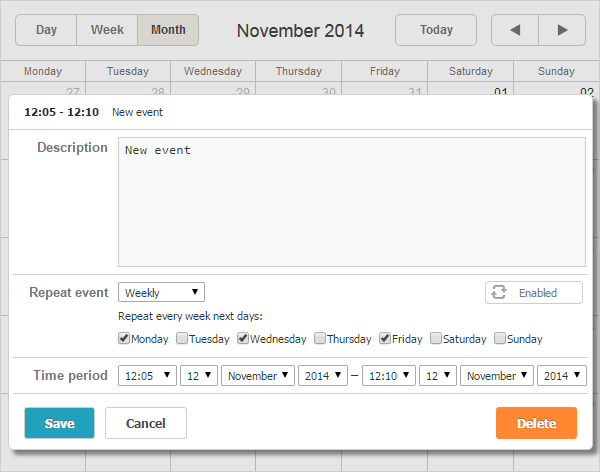
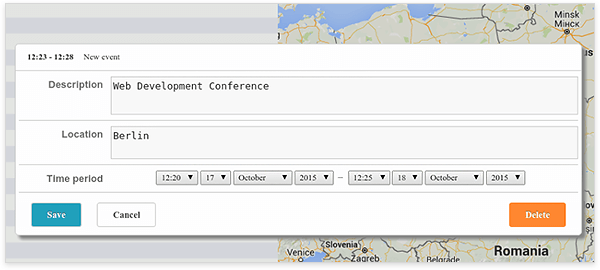
The next step is Lightbox configuration. Lightbox is an edit form used to alter the event’s details. Here’s how it looks like by default:
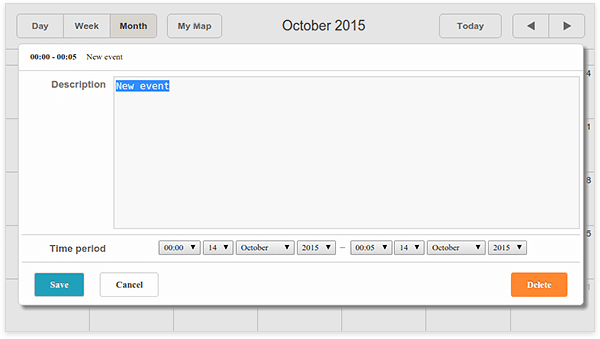
As you can see, there’s no possibility to specify the location. Let’s fix it:
scheduler.config.lightbox.sections=[
{name:"description", height:50,map_to:"text", type:"textarea", focus:true},
/* adding new textarea */
{name:"location", height:43, map_to:"event_location", type:"textarea"},
{name:"time", height:72, type:"time", map_to:"auto"}
];
{name:"description", height:50,map_to:"text", type:"textarea", focus:true},
/* adding new textarea */
{name:"location", height:43, map_to:"event_location", type:"textarea"},
{name:"time", height:72, type:"time", map_to:"auto"}
];
Done. Now you able to add the location information to your events.
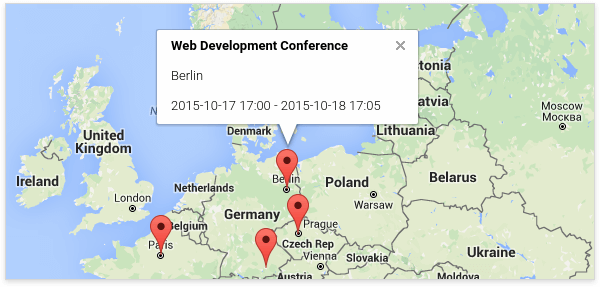
Here’s how the Map view works:
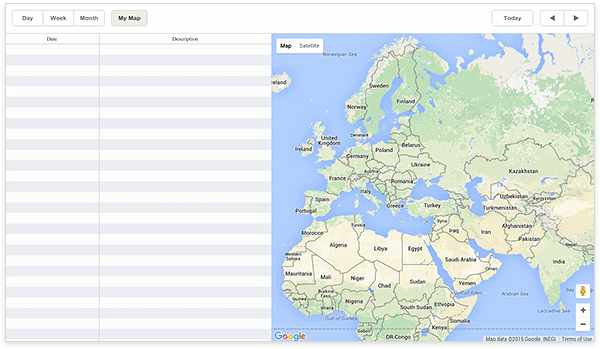
There are two areas: a list of upcoming events and Google Map that shows the event’s location. To create a new event, you can double click on an empty cell of the list or the desired location on the map:
After you create the event, it will appear on the list, and a new marker will be added to the map. You can click on the ‘details’ icon on the left side of the event’s description to edit or delete it. To overview the event, click the marker:
Learn more: Map View Documentation Page
dhtmlxScheduler is a JavaScript Schedule Calendar that gives you the ability to develop Google-like event calendar in your application. Using dhtmlxScheduler, you may build agenda, appointment, week calendars, and more others. Get learn about our JavaScript scheduler control in its documentation and start using it now.
↧