Our dhtmlxScheduler provides you with the different types of data visualization. Besides the popular options, such as different time scales like day or week, our scheduler gives you some additional possibilities. For example, you can combine your schedule with the map that can be pretty helpful in case you want to plan your business trip or vacations.
If you’re working with ASP.NET, you may look at DHTMLX Scheduler.NET, a Scheduler control that works both in ASP.NET MVC and Web Forms. It has the similar range of views that are described below.
![calendar_basic_views]()
Usually, there are only three required steps that allow you to use the view you want:
1. Include the required files to your project
2. Add the proper tab to your page, so you can switch to the view you want
3. Configure the view
To understand how the views work, let’s start with the default ones.
Default Views: Day, Week, and Month
This Getting Started Guide can help you build the basic scheduler.
As we mentioned before, you should add the proper files firstly:
<link rel="stylesheet" href="./codebase/dhtmlxscheduler.css">
<script src="./codebase/dhtmlxscheduler.js"></script>
And here’s a bunch of DIV containers you should use to make your application work:
<div id="scheduler_here" class="dhx_cal_container" style='width:100%; height:100%;'>
<div class="dhx_cal_navline">
<div class="dhx_cal_prev_button"> </div>
<div class="dhx_cal_next_button"> </div>
<div class="dhx_cal_today_button"></div>
<div class="dhx_cal_date"></div>
<div class="dhx_cal_tab" name="day_tab" style="right:204px;"></div>
<div class="dhx_cal_tab" name="week_tab" style="right:140px;"></div>
<div class="dhx_cal_tab" name="month_tab" style="right:76px;"></div>
</div>
<div class="dhx_cal_header"></div>
<div class="dhx_cal_data"></div>
</div>
This code creates Next and Previous navigation buttons, shows you the current period, etc.
Particularly, we’re interested in these three DIV’s:
<div class="dhx_cal_tab" name="day_tab" style="right:204px;"></div>
<div class="dhx_cal_tab" name="week_tab" style="right:140px;"></div>
<div class="dhx_cal_tab" name="month_tab" style="right:76px;"></div>
We’ve created three tabs that can be used to switch between the Day, Week, and Month views.
During the initialization you can set the default options: an HTML container your calendar will be initialized in, the initial date of the scheduler, and the name of the initial view:
scheduler.init('scheduler_here', new Date(), 'month');
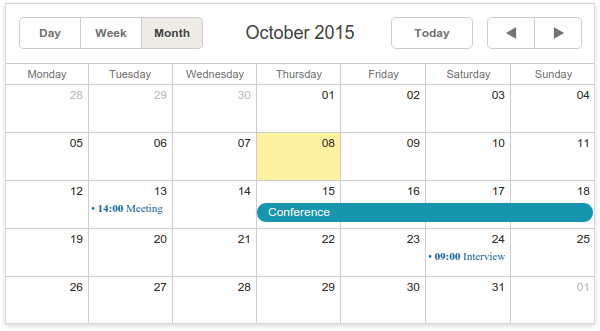
Here’s how the typical basic scheduler looks like:
![Basic view in Scheduler]()
As you can see, there are some previously created events rendered.
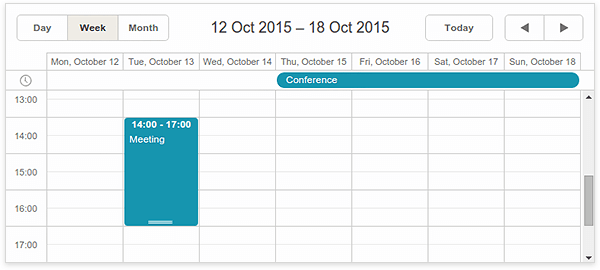
You can use tabs to switch between the available views. Here’s the Week view:
![Week view]()
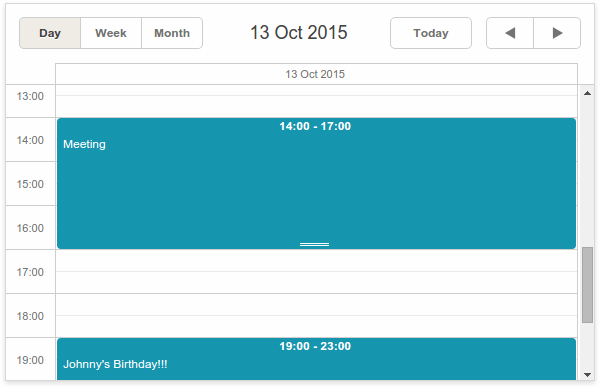
And here’s how the Day View looks like:
![Day View]()
You can double-click an empty cell to create a new event or drag the existing event through the calendar grid to change the date.
Learn more: Day View, Week View, Month View.
Extending the Period. The Year View
If one month is not long enough to plan your schedule, there’s always a possibility to use the Year View.
First of all, you should include the required JavaScript file:
<script src="./codebase/ext/dhtmlxscheduler_year_view.js" ></script>
Then, add the proper tab to your page:
<div class="dhx_cal_tab" name="year_tab" style="right:280px;"></div>
And finally, set the label for the tab:
scheduler.locale.labels.year_tab ="Year";
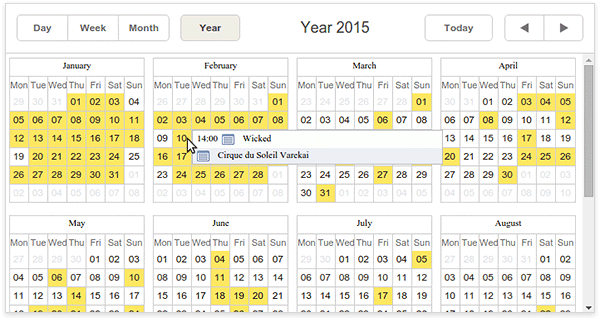
That’s it. Now you can use the Year View:
![Year View]()
The tooltip you can see at the screenshot above allows you to edit the event. Just click the “Details” icon and the edit window will appear on the screen.
Learn more: Year View Documentation Page.
All at Once. Agenda, Week Agenda, and Grid
Now, let’s talk about the views that allow you to see all available events in the form of different types of lists.
The Agenda view displays a list of all upcoming events. To enable this view you should add the proper JavaScript to your project:
<script src="./codebase/ext/dhtmlxscheduler_agenda_view.js" ></script>
The next step is to add the tab to your page:
<div class="dhx_cal_tab" name="agenda_tab" style="right:280px;"></div>
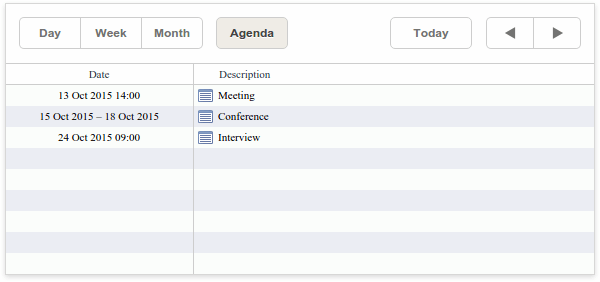
As a result, you’ll get a list that contains all your tasks:
![Agenda]()
You can double-click on an empty self of this list to create a new event or click the “Details” button to edit the existing ones.
Learn more: Agenda View Documentation Page
The Week Agenda view is a combination of two views: Week and Agenda. This view shows you a list of upcoming events within a week.
Here’s the required JavaScript file:
<script src="./codebase/ext/dhtmlxscheduler_week_agenda.js" ></script>
And here’s the code that adds the proper tab:
<div class="dhx_cal_tab" name="week_agenda_tab" style="right:280px;"></div>
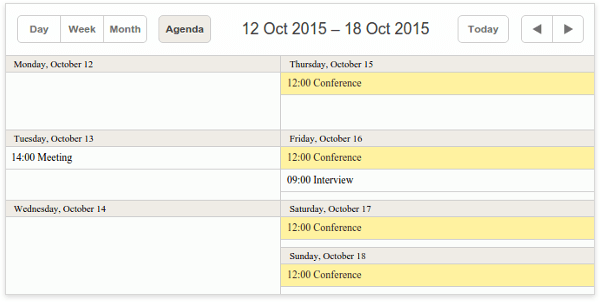
The result is shown below:
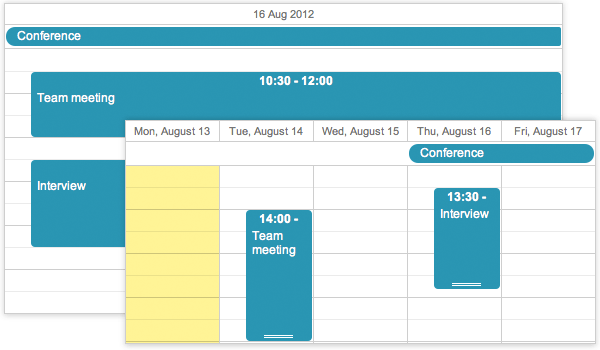
![Week Agenda]()
As you can see, this view shows you the whole week at once. You can double-click the empty cell to create a new event. Double-clicking the existing event will open the edit window. Another handy feature is events highlighting. You can click the event to select it. After you select the long term event, all related records will be highlighted.
Here’s how it looks like:
![Highlighted agenda]()
Learn more: Week Agenda View Documentation Page
The Grid View looks similar to the Agenda view. But in this case, you can choose the data you want to display.
Imagine that you wish to add some comments to your calendar. Here’s how the possible array of events will look like:
var events = [
{id:1, text:"Meeting", start_date:"2015-10-13 14:00",
end_date:"2015-10-13 17:00", comment:"Project release issues"},
{id:3, text:"Interview", start_date:"2015-10-24 09:00",
end_date:"2015-10-24 10:00", comment:"Remember to smile!"},
{/* some more events */}
];
Let’s add the Grid view to our application. First of all, the required file:
<script src="./codebase/ext/dhtmlxscheduler_grid_view.js"></script>
Now you should add the Grid tab:
<div class="dhx_cal_tab" name="grid_tab" style="right:300px;"></div>
Configure the date format and change the tab label if you want to:
scheduler.config.xml_date = "%Y-%m-%d %H:%i";
scheduler.locale.labels.grid_tab = "My Grid";
Now, the most important part. We must configure the grid. You should call the createGridView method to do so:
scheduler.createGridView({
name:"grid",
fields:[ /* defines columns of the grid */
{id:"id", label:"ID", sort:"int"},
{id:"date", label:"Date", sort:"date"},
{id:"text", label:"Event", sort:"str"},
{id:"comment", label:"Comment", sort:"str"}
],
});
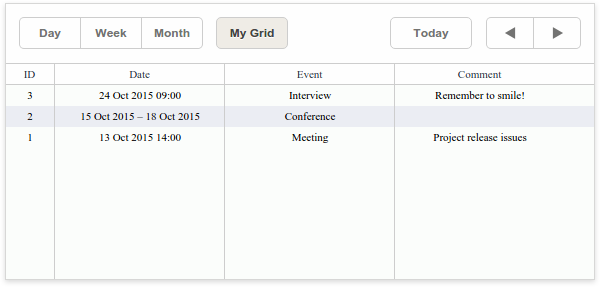
Here’s an explanation of what we’ve done. This code will create new grid with name grid that will contain a bunch of columns that the fields property contains. In this case, we have used the id property to choose what data we you want to display. It can be the ID of the event, its beginning date, or even a comment that you’ve added. The second property in our example is label. It defines the label for the column. The last property, sort, specifies the type of content that will be displayed in this column. It specifies the way of sorting. Possible values are ind, date, and str.
The result is shown below:
![Grid view]()
Besides this minimal amount of properties, many others can help you configure your application the way you want. You can set the with of a column, choose the date range, use custom sorting functions, etc.
Learn more: Grid View Documentation Page
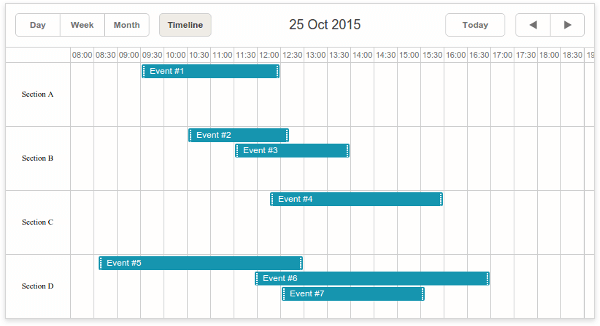
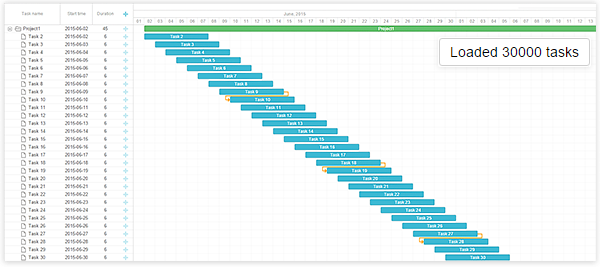
Timeline View and Units View
These views allow you to visualize events horizontally with separate timelines arranged from left to right (Timeline View) or vertically
Let’s start from the Timeline View.
Add the proper JavaScript file:
<script src="./codebase/ext/dhtmlxscheduler_timeline.js"></script>
Then add the tab to your page:
<div class="dhx_cal_tab" name="timeline_tab" style="right:280px;"></div>
and set its label:
scheduler.locale.labels.timeline_tab ="Timeline";
Now you can call the createTimelineView method to configure the view
scheduler.createTimelineView({
name:"timeline",
x_unit:"minute",//measuring unit of the X-Axis.
x_date:"%H:%i", //date format of the X-Axis
x_step:30, //X-Axis step in 'x_unit's
x_size:24, //X-Axis length specified as the total number of 'x_step's
x_start:16, //X-Axis offset in 'x_unit's
x_length:48, //number of 'x_step's that will be scrolled at a time
y_unit: //sections of the view (titles of Y-Axis)
[{key:1, label:"Section A"},
{key:2, label:"Section B"},
{key:3, label:"Section C"},
{key:4, label:"Section D"}],
y_property:"section_id", //mapped data property
render:"bar" //view mode
});
It’s big enough but have no fear. Check the comments. To help you better understand what’s going on here’s little explanation. Besides the X-Axis configuration, you should also define the x-unit property that defines how many areas your calendar will consist of. In this example above we’ve created four areas with labels Section A, Section B, etc. The render property defines the view mode. There are Bar, Cell, Tree, and Days options available. The y_property property will help you attach an event to a proper timeline area. For example, if you want to add an event to Section A you should add the following property: y_property: “1”.
![Timeline View]()
Learn more: Timeline View Documentation Page
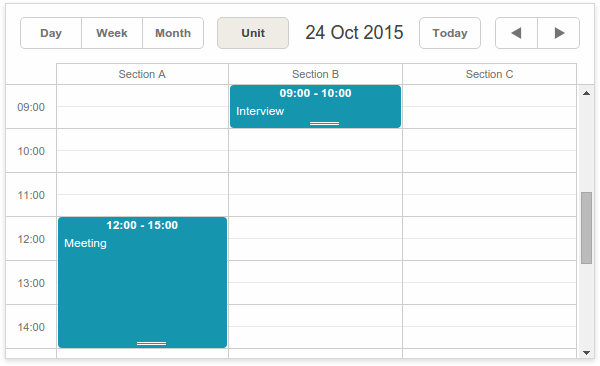
The Units View looks pretty much the same. The main difference, in this case, is that you can configure the X-Axis.
By tradition, add the JavaScript file:
<script src="./codebase/ext/dhtmlxscheduler_units.js"></script>
and add the tab to your page:
<div class="dhx_cal_tab" name="unit_tab" style="right:280px;"></div>
You can use this code to set the label fir the tab:
scheduler.locale.labels.unit_tab = "Unit"
To configure how the X-Axis will look like, you should use the createUnitsView method:
scheduler.createUnitsView({
name:"unit",
property:"unit_id", //the mapped data property
list:[ //defines the units of the view
{key:1, label:"Section A"},
{key:2, label:"Section B"},
{key:3, label:"Section C"}
]
});
This code will create a new view with name units. property defines the property name that can be used to define which unit will contain the proper event. The list array contains the key property that you should use to attach the event to the unit, and the label property that defines unit’s label.
That’s all you need to do for the basic configuration. The final step is to change the way you define your event. All you need to do is to add new property that will define which unit this event belongs. For example:
var events = [
{id:1, text:"Meeting", start_date:"2015-10-13 14:00",
end_date:"2015-10-13 17:00", unit_id: "1"},
{id:2, text:"Interview", start_date:"2015-10-24 09:00",
end_date:"2015-10-24 10:00", unit_id:"2"},
{ /* more events */ }
];
In this case, unit_id: “1” means that the first event will be placed within the unit with the key: 1 property.
Here’s how this view looks like:
![Unit View]()
Besides this very basic functionality, Units View allows you to assign events to several units, or, for example, display units for multiple days. Better check the documentation page to learn how you can configure it.
Learn more: Units View Documentation Page
Map View
If you travel a lot, this view will be pretty helpful, since it provides you with possibility to combine the event description wit the marker on the map. This view uses Google Maps, so this time besides the Map View JavaScript file, we should include the required Google Maps file:
<script src="http://maps.google.com/maps/api/js?sensor=false"></script>
<script src="./codebase/ext/dhtmlxscheduler_map_view.js"></script>
Don’t forget to add the Map view tab to your page:
<div class="dhx_cal_tab" name="map_tab" style="right:280px;"></div>
And remember that it’s alway possible to rename it:
scheduler.locale.labels.map_tab = "My Map";
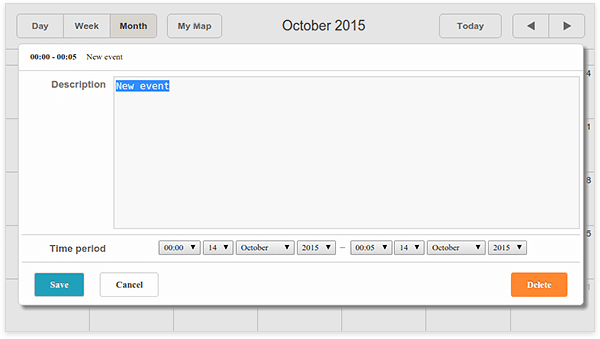
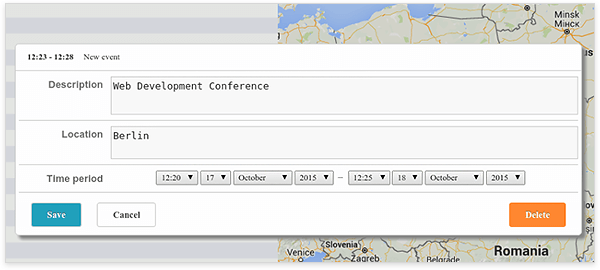
The next step is Lightbox configuration. Lightbox is an edit form used to alter the event’s details. Here’s how it looks like by default:
![Lightbox]()
As you can see, there’s no possibility to specify the location. Let’s fix it:
scheduler.config.lightbox.sections=[
{name:"description", height:50,map_to:"text", type:"textarea", focus:true},
/* adding new textarea */
{name:"location", height:43, map_to:"event_location", type:"textarea"},
{name:"time", height:72, type:"time", map_to:"auto"}
];
Done. Now you able to add the location information to your events.
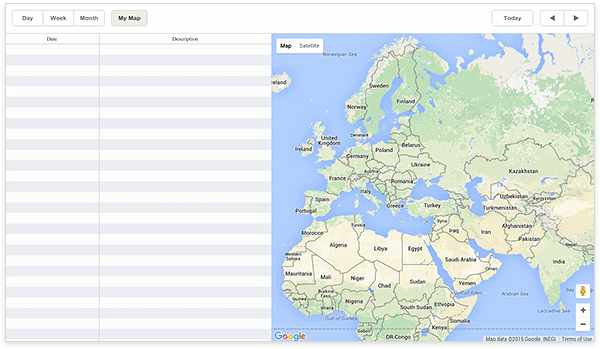
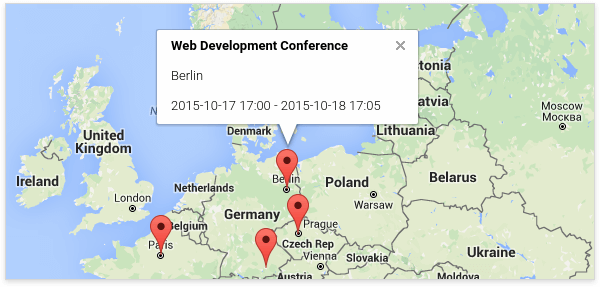
Here’s how the Map view works:
![Map View]()
There are two areas: a list of upcoming events and Google Map that shows the event’s location. To create a new event, you can double click on an empty cell of the list or the desired location on the map:
![Lightbox in Map View]()
After you create the event, it will appear on the list, and a new marker will be added to the map. You can click on the ‘details’ icon on the left side of the event’s description to edit or delete it. To overview the event, click the marker:
![Marker in Map View]()
Learn more: Map View Documentation Page
dhtmlxScheduler is a JavaScript Schedule Calendar that gives you the ability to develop Google-like event calendar in your application. Using dhtmlxScheduler, you may build agenda, appointment, week calendars, and more others. Get learn about our JavaScript scheduler control in its documentation and start using it now.